
download pdf
Wireless security is key to any successful wireless network operation. There are many vulnerabilities that can exploit wireless networks for reconnaissance, compromise, degrade, or disable wireless access all together. Examples include Airsnarf attacks, rogue Access Points, honeypot & honeypotter tools, and Denial-of-Service (DoS) attacks like beacon flood, deauth flood, and some of the recent ones such as KRACK and FRAG attacks. See the Resources section for a detailed list of common attacks & signatures.
At the very least, what we typically want in our wireless network is to:
- Detect threats immediately!
- Have the ability to contain devices that are performing attacks.
- Find the attack device location.
- Keep the system signature up to date to detect new threats and improve security over time.
Our goals for this article are for you to understand the above items and help you deploy them in a Cisco wireless network environment.
So, if wireless security is something that interests you, then please continue on! (estimated read time: 15 minutes)
Looking Back
Wireless based attacks are nothing new. They date back to 1903 when Guglielmo Marconi set up a large wireless demonstration – a Morse code transmission 300 miles across England – when a signal intrusion occurred from rival inventor Nevil Maskelyne. In other words, early evidence of a wireless hacker!
But coming back to recent history on the LAN side, every Cisco wireless controller has always had some form of wireless security intrusion prevention built into it. However, it’s more of a question of how many signatures it can support… because the more signatures supported, the more threats it can detect.
For example, an AirOS controller is supported by about 17 signatures, including:
- Bcast deauth
- NULL Probe Response – Zero length SSID element
- NULL Probe Response – No SSID element
- Association request flood
- Authentication request flood
- Broadcast Probe request flood
- Disassociation flood
- Deauthentication flood
- Reserved mgmt 7
- Reserved mgmt F
- EAPOL flood
- Wellenreiter
- NetStumbler
Cisco Meraki markets WIPS with the name Air Marshall and has 24+ signatures.
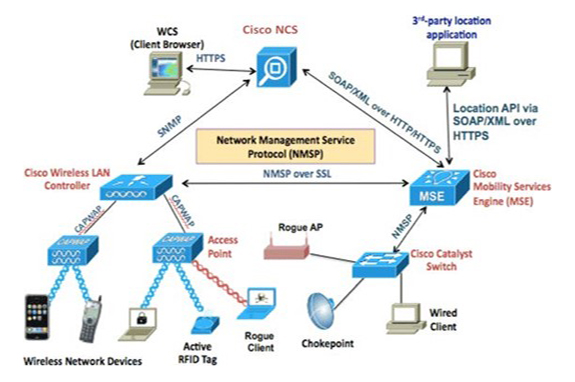
In the recent past we used something called Mobility Services Engine with WIPS services running on it, increasing the signature count from 17 on WLC to 60+ signatures. If you ran another MSE or CMX for location services, you were able to pinpoint the location of these malicious/rogue devices as well.
You are probably familiar with this architecture below, and maybe even deployed it at some point:
But things have evolved since then. Since MSE version 8.0.150.0, we have been waiting for a new platform for the replacement of the MSE WIPS platform.
Modern Solutions
This brings us to present day with the release of the DNA Center 2.1.2 WIPS application package. With IOSXE based controller, tri radio access points, and a cloud-based location engine like DNA Spaces, it’s a new world! However, so are the threats on wireless. We have to learn how to use these new tools to protect our network.
Rogue Management & Wireless Intrusion Prevention System (WIPS)
We are dealing with two different terms here: Rogue Management for rogue APs and WIPS for intrusion attacks. Let’s clarify the difference before we move forward:
- Rogue AP: Every time a Cisco AP joins the controller, the controller adds a little authentication Information Element (IE) into its beacon/probe frame. It’s like a dress code: if you don’t have the dress code (IE in your beacon frame in this case), then the AP is a rogue. APs listen to all APs around them, and if they see a beacon frame without IE code, they consider it to be advertised by a rogue AP
- Intrusion Attack: Intrusion attack is an AP or client performing a malicious behavior. This AP can very well be a rogue AP, a client connected to a rogue AP, or a client connected to your own infrastructure. Examples include 1) an AP configured to advertise the same SSID as your corporate SSID to redirect traffic to itself and steal passwords and 2) an endpoint sending a deauthenticaton frame flood on the same channel as the production AP to kick out users and cause service disruption.
Given the nature of WiFi, you are either listening or transmitting at a time, so if you are listening to beacon frame for rogue then you are not serving your clients. Not so long ago the solution was to add an extra AP for every 5-6 APs at the highest power and lowest data rate, which worked in dedicated monitor mode and this AP’s job was just to listen and report without worrying about serving clients. More recently, most APs comes with a third radio element that can be used for multiple functions. One of the functions Is to constantly monitor/listen to the air while the other two radios are dedicated to serve the clients.
Most vendors who support the third radio have a unique way of deploying it. As far as Cisco 9100s are concerned, slot 1 (5Ghz) can be divided into dual radio that uses 5Ghz as 4X4 and frees up the third radio for additional functions like monitoring. If you do not plan to do this, then you can use slot 1 as 8X8 radio. By default, slot 1 is dual radio capable but is disabled.

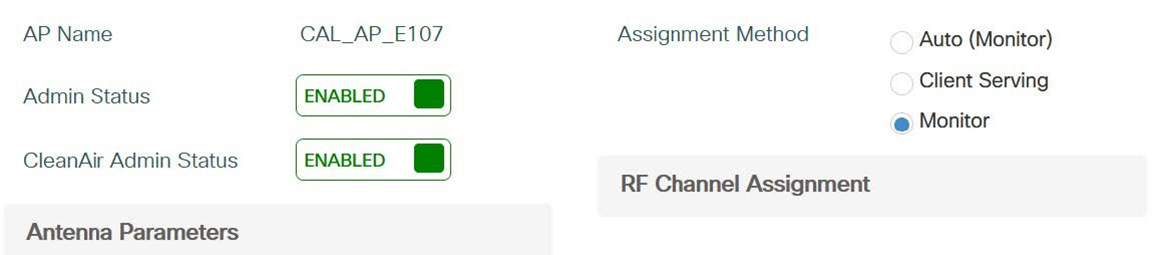
To enable it, we have to first enable triband globally. Then enable dual radio on an individual AP and assign respective role to both radios. In this example case I will use the 1st radio slot 1 for client serving and 2nd radio slot 1 (slot2) for monitoring.
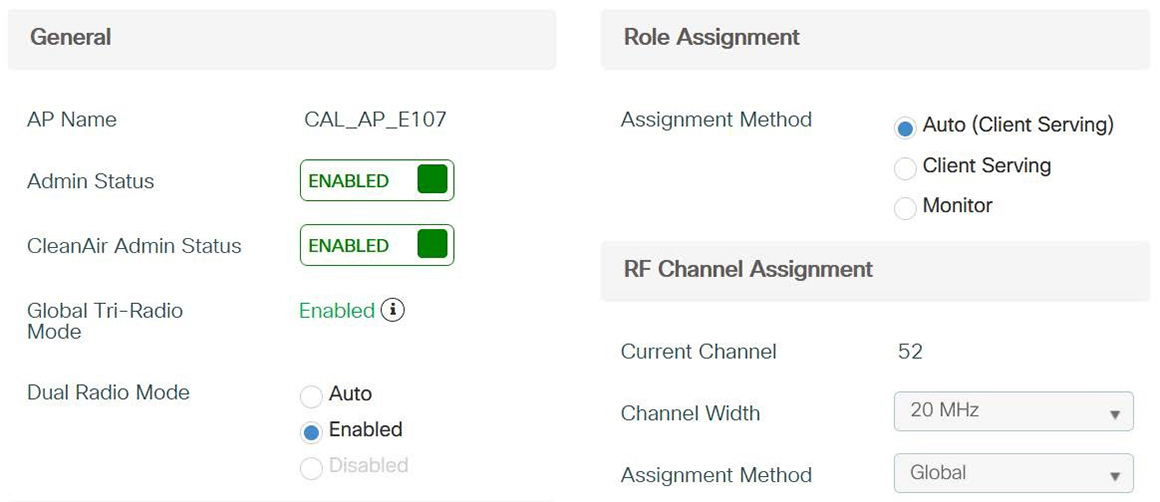
Here is tri radio in action, with slot 0 (2.4GHz) serving clients on channel 1, slot 1 (5GHz) serving clients on channel 52, and slot2 used for dedicated monitor mode.
If you plan on trying this out, I suggest you read this document first: Cisco Access Points with Tri-Radio
Now that I’ve prepped our infrastructure to better listen to rogues, let’s get our controllers configured for WIPS and rogues to achieve our first task…
Detect Threats Immediately
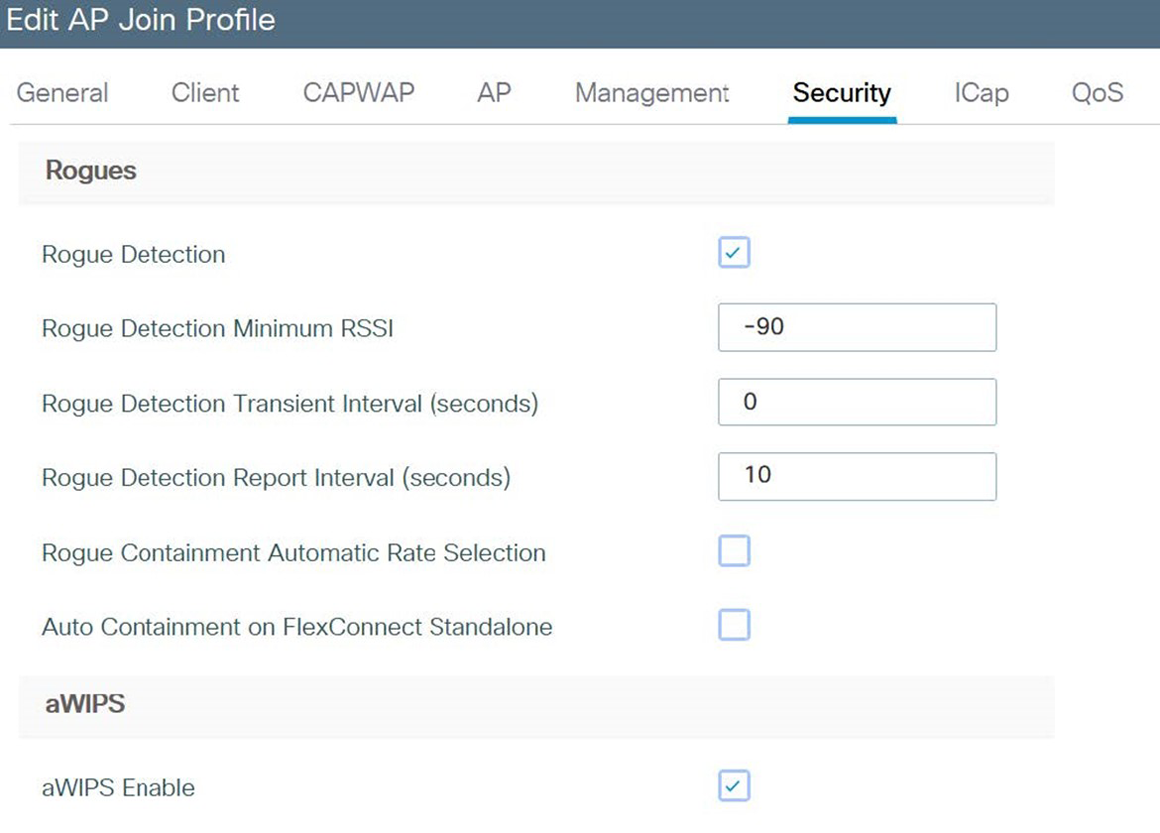
We start by enabling rogue detection and a WIPS under the AP join profile, which pushes the configuration to all APs. We can visit Monitor-WIPS to start seeing threats immediately.

Since I have DNA Center (DNAC), I also want to take advantage of that to enable rogue and WIPS. As soon as I do this, DNAC will push a configuration to the controller. This will ask the controller to add to DNAC the WIPS and rogue configuration to the telemetry data its streaming. Not that you have to worry about the configuration, but the config pushed by DNAC to the controller looks something like this:
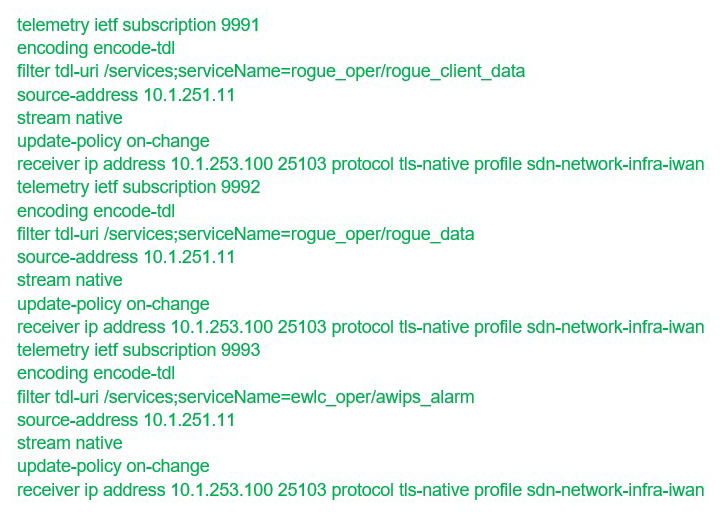
With this, the controller will immediately start streaming WIPS and rogue data to DNAC. Now we have a single point of visibility and management for rogue and WIPS.
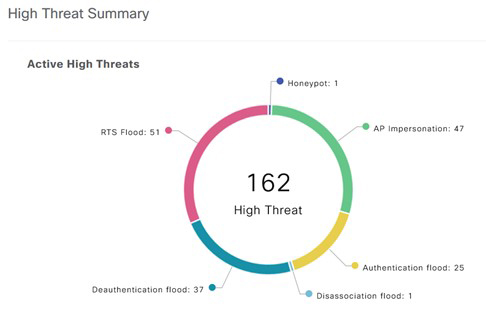
Here is an example of some of the threats detected by controller and pushed to DNAC. You should also be mindful of a bug that causes an AP to detect itself as rogue (click for details).
Now that we have our detection working, we can start to look at our second task…
Ability to Contain Devices that are Performing Attacks
Containment can be done automatically based on certain rules or it can be done manually. You need to be aware of a legal aspect to containment before containing a device.
Let’s say I want to automatically mark a rogue as malicious and contain it if it is advertising the same SSID as my corporate infrastructure (honeypot).

You can get as creative as you want here! Even if the AP is contained, one might be interested to know the details of this AP and location of this rogue.
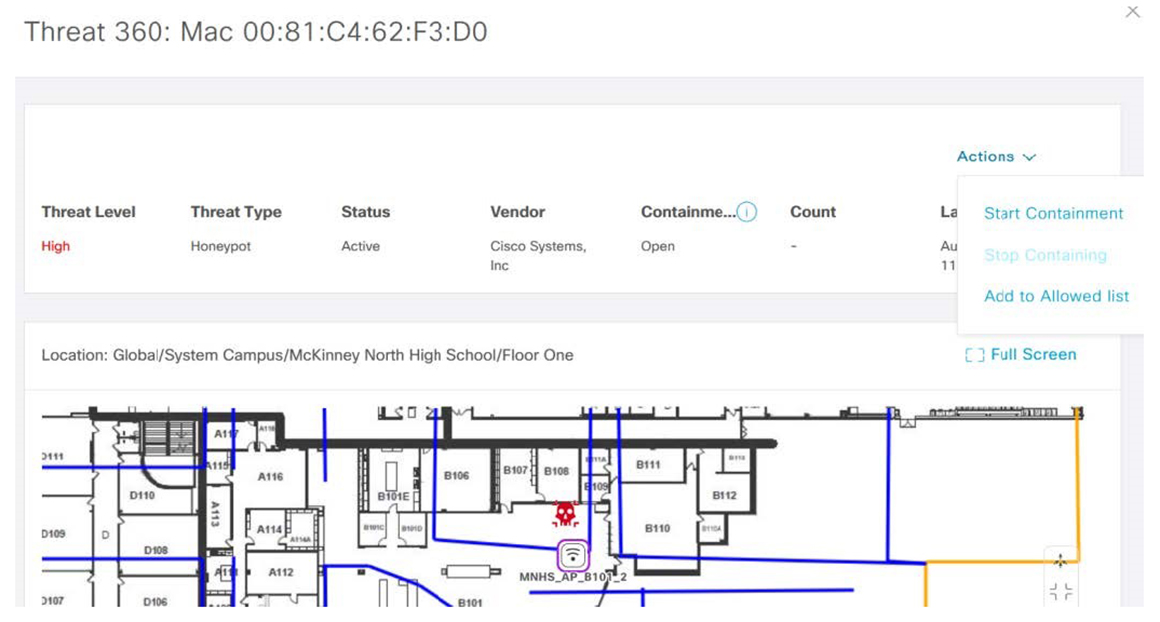
Another option is to contain the threat manually through DNA Center:
Which brings us to the third objective…
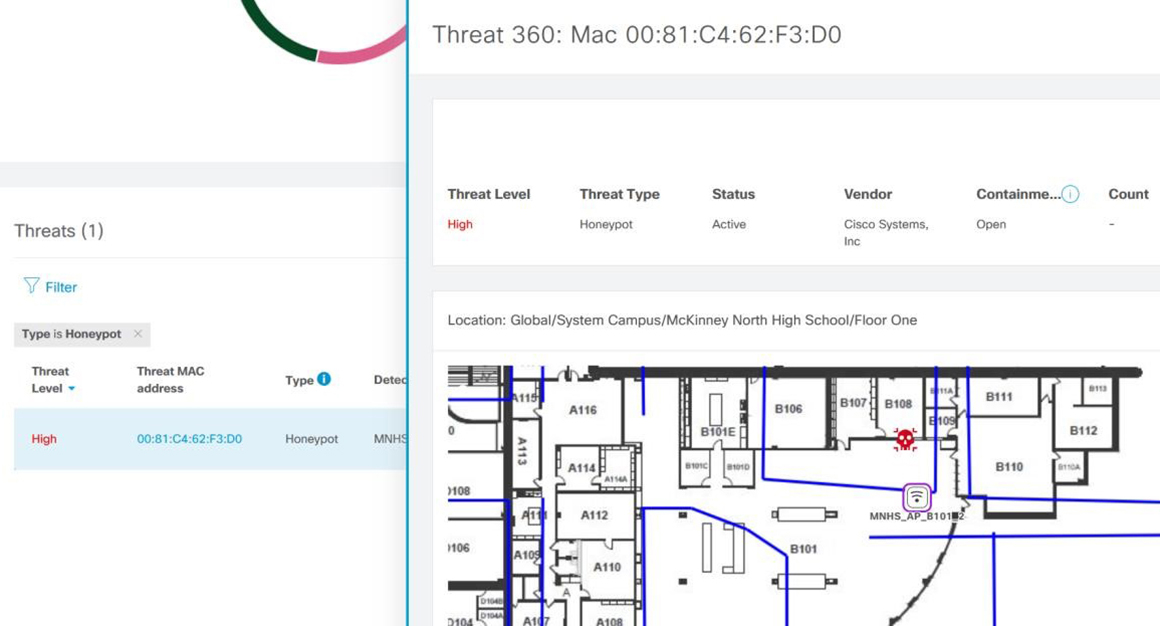
Find the Attack Device Location
We need some kind of location-based engine in order to add location attribute to the devices, APs, interferers, rogues, attackers, etc. DNA Spaces does a great job at this and provides a comprehensive view of the floor with all elements.
Your point of location management is still DNA Center; DNA Spaces syncs its map with DNA Center and, in this case, acts more like an engine to push location data to DNA Center. By simply clicking the alert details, DNA Center takes me to the exact location of the honeypot device, thanks to DNA Spaces.
With every new release of software version, we are seeing more and more signatures being added, which brings us to the final goal…
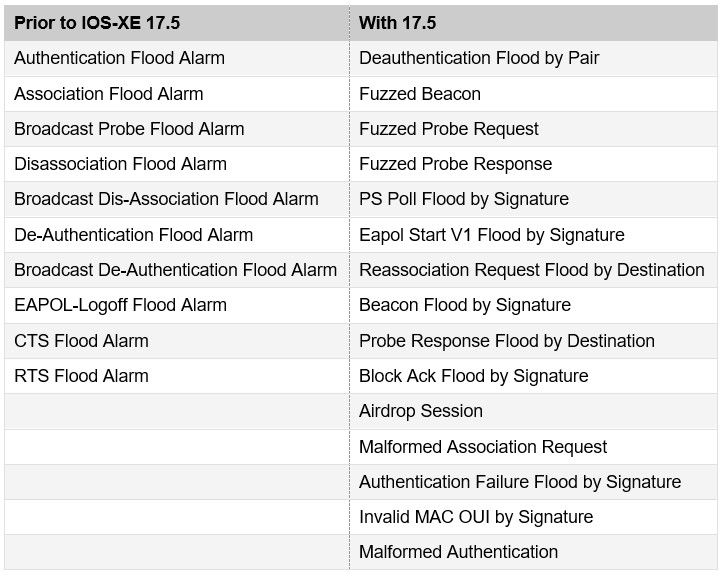
Keep the System Signature Up to Date
Manually updating the intrusion prevention signature on the system to detect new threats is something handled by Cisco. For instance, prior to IOS-XE 7.5 only limited signatures were supported but that list grew much longer with 17.5. Cisco also gives you the ability to download static signature packages. If you are interested in this, I recommend that you work with Cisco Technical Assistance Center (TAC).
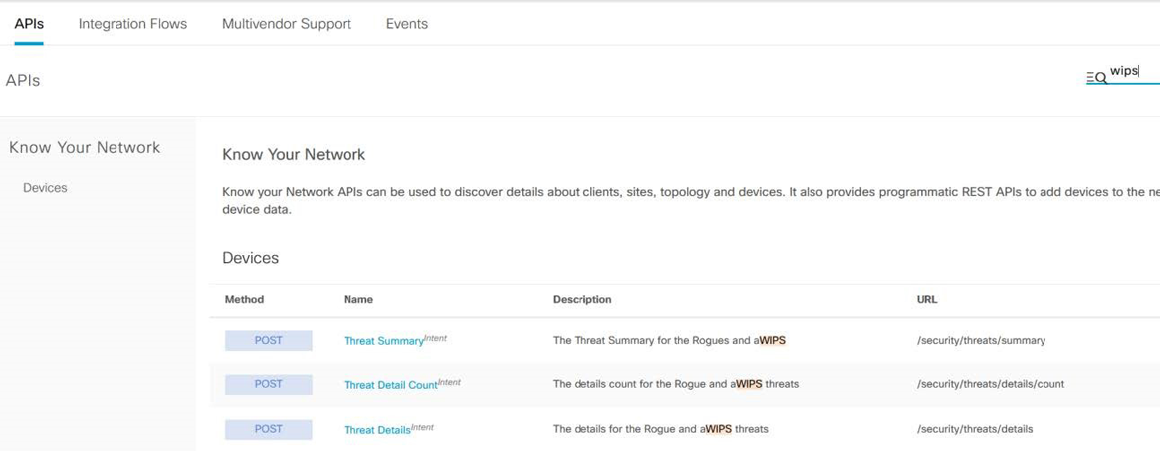
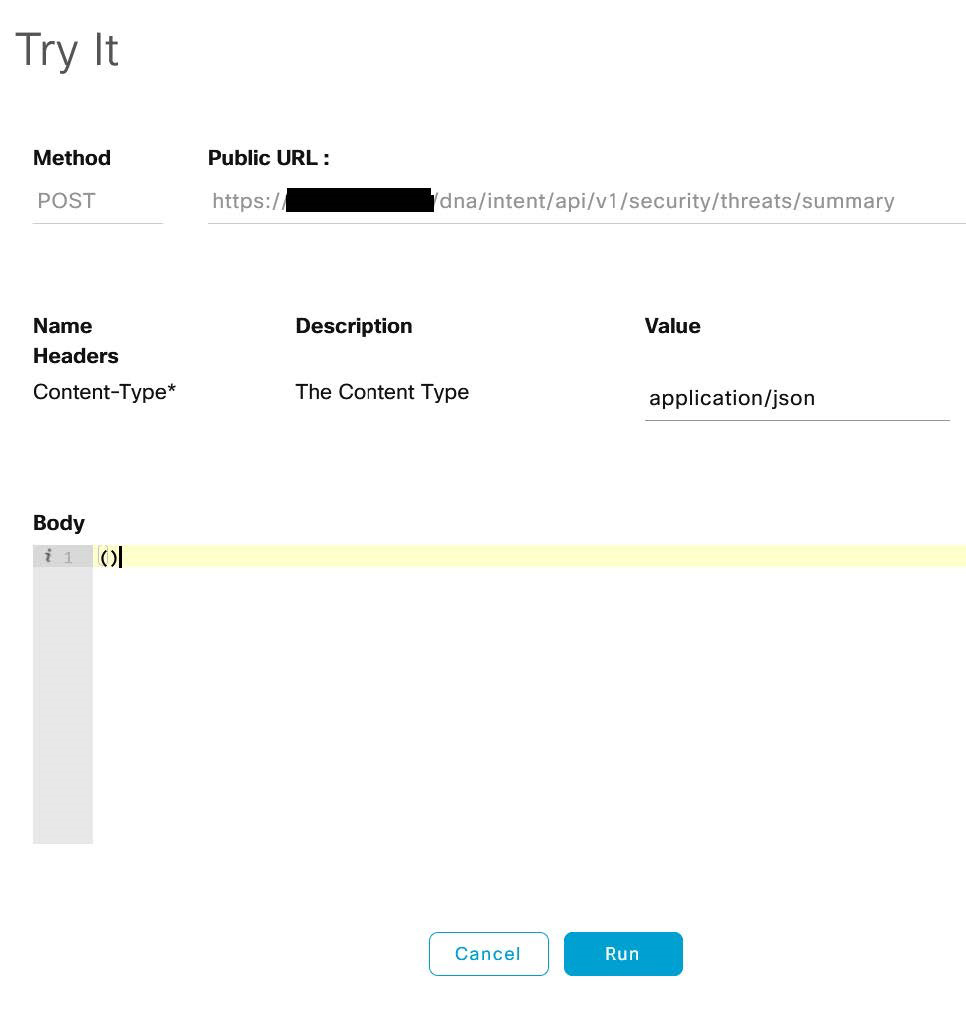
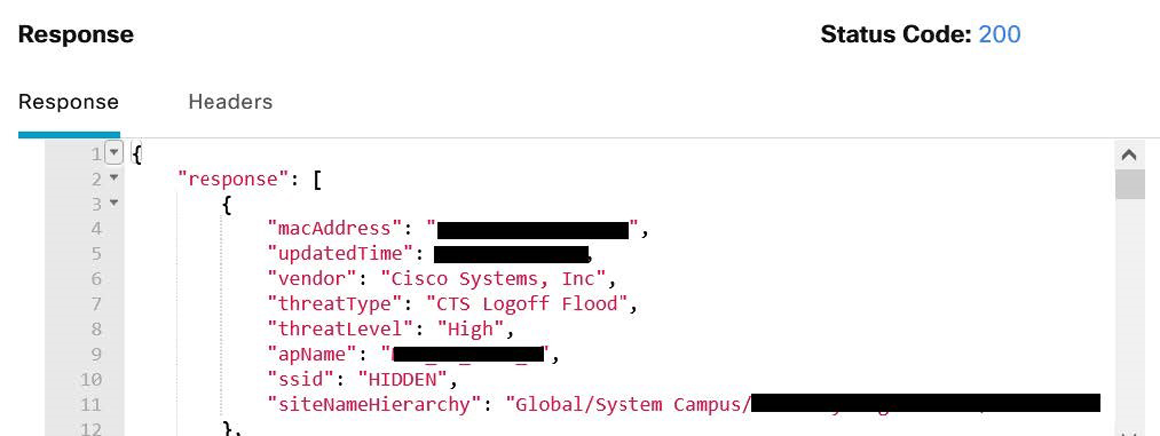
Last, but certainly not least, you can also consume WIPS data with other applications. DNA Center has APIs for WIPS. To use it, make sure to activate the WIPS API bundle.

Under “Develop Tools” search for “WIPS” and it will show all supported API calls that you can make.
Conclusion
One of the goals of Cisco DNA Center, Wireless Infrastructure, and DNA Spaces is to provide visibility into your network for Rogue and WIPS. If you already have DNA Center, then you can start taking advantage of it and using this feature simply by installing the WIPS package and activating it.
I hope you gained some valuable information and insight for your network. If you plan to try it out, I highly encourage you do so in a test environment first.
If you have any questions, please reach out to your DSI account manager or email [email protected]. They can get put you in touch with me directly and we can talk about it further.
See you next month with a new topic!
Resources
- Cisco Access Points with Tri-Radio
- Cisco Adaptive WIPS Deployment Guide
- Cisco Catalyst 9800 Series Wireless Controller Software Configuration Guide, Cisco IOS XE Bengaluru 17.4.x
- Cisco Catalyst 9800 Series Wireless Controller Software Configuration Guide, Cisco IOS XE Bengaluru 17.5.x
- Cisco Technical Assistance Center (TAC)
Common Attacks & Signatures
| Airdrop Session | Airdrop session refers to the Apple feature named AirDrop. AirDrop is used to setup a peer-to-peer link for file sharing. This might create a security risk due to unauthorized peer-to-peer networks dynamically created in your WLAN environment. |
| Authentication Failure Flood by Signature | Authentication Failure Flood is when a specific device tries to flood the AP with invalid authentication requests spoofed from a valid client. This results in disconnection. |
| Beacon Flood by Signature | Beacon Flood is when stations actively search for a network bombarded with beacons from networks generated using different MAC addresses and SSIDs. This flood prevents a valid client to detect beacons sent by corporate APs. This initiates a Denial-of-Service attack. |
| Block Ack Flood by Signature | Block Ack Flood is when an attacker transmits an invalid Add Block Acknowledgement (ADDBA) frame to AP while spoofing the MAC address of the valid client. This process causes AP to ignore any valid traffic transmitted from the client until it reaches the invalid frame range. |
| Deauthentication Flood by Pair | In the enhanced context of threat, both source (attacker) and destination (victim) of attacks (Track by Pair) have visibility. |
| EAPOL Start V1 Flood by Signature | EAPOL Start Flood is when an attacker attempts to bring down an AP by flooding it with EAPOL-Start frames to exhaust the AP internal resources. |
| Fuzzed Beacon | Fuzzed Beacon is when invalid, unexpected, or random data is introduced in the beacon and replays those modified frames into the air. This causes unexpected behavior on the destination device that includes driver crashes, operating system crashes, and stack-based overflows. This in turn allows execution of arbitrary code of the affected system. |
| Fuzzed Probe Request | Fuzzed Probe Request is when invalid, unexpected, or random data is introduced in the probe request and replays those modified frames into the air. |
| Fuzzed Probe Response | Fuzzed Probe Response is when invalid, unexpected, or random data is introduced in the probe response and replays those modified frames into the air. |
| Invalid MAC OUI by Signature | Invalid MAC OUI is when a spoofed MAC address is used that does not have a valid OUI. |
| Malformed Association Request | Malformed Association Request is when an attacker sends a malformed association request to trigger bugs in AP. This results in Denial-of-Service. |
| Malformed Authentication | Malformed Authentication is when an attacker sends malformed authentication frames that can expose vulnerabilities in some drivers. |
| Probe Response Flood by Destination | Probe Response Flood is when a device tries to flood the clients with a large number of spoofed probe responses from AP. This prevents clients from detecting the valid probe response sent by the corporate APs. |
| PS Poll Flood by Signature | PS Poll Flood is when a potential hacker spoofs the MAC address of the wireless client and sends out a flood of PS poll frames. The AP sends out the buffered data frames to the wireless client. This results in client missing the data frames as it could be in the power safe mode. |
| Reassociation Request Flood by Destination | Reassociation Request Flood is when a specific device tries to flood the AP with a large number of emulated and spoofed client re-associations, to exhaust the APs resources, particularly the client association table. Once the client association table overflows, the legitimate clients are not able to associate, causing a DoS attack. |
About the Author
Ambuj M. is a Cisco Certified Internetwork Expert (CCIE) and Certified Wireless Network Expert (CWNE) with 15 years of industry experience. He currently works as a Network Solutions Architect for DISYS Solutions Inc. (DSI Tech).